Sunday, May 17, 2015

Repurposed Vintage Suitcases


I made my first Mod Podged suitcase years ago and have been stock piling vintage suitcases ever since. Whenever I am out thrifting I keep my eyes open for nice old hard sided suitcases. There's a few things I look for:
1. Good outside surface free of dents.
2. Working locks (bonus if there are keys!).
3. No weird smells (old stuff can have smells that are hard to get rid of).
4. Inside lining intact and free of rips.

Once you have your suitcase you'll need a few other things:
1. A water based matte sealer like Mod Podge ( Biggest jar 32 fl oz $11 at Walmart) There are also recipes to make your own on the internet. Haven't tried any of them as I am all about saving time at this junction in my life. I will definitely try them later!
2. Big paintbrush or foam brush. I use a large bristle paint brush.
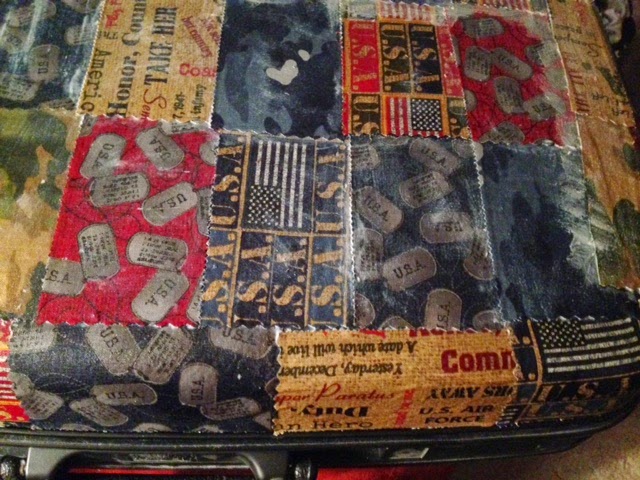
3. Fabric. I only use good quality cotton fabric. I used a polly blend once and when the fabric dried it showed the suitcase color through. It was not pretty. The most time consuming part is cutting the fabric into 6x6 squares. I used pinking shears at first, then transitioned to a rotary tool to save time. You can cut a straight edge but you will have lots of strings when the squares fray. To save even more time/energy I now just use pre cut fabric squares that come in Charm packs. They are a little more expensive but well worth it to me..all about saving time/energy lately. If you cut your fabric you will also need a large cutting mat, and ruler or quilters rule. These things make it much easier to cut straight even squares.
4. Paper towels or wet wipes. Just in case you need to wipe up a drip or dribble.

I am recovering from a surgery I had in April so I have been covering the suitcases while sitting in my recliner watching TV.  I don't cover me or my work area, but would suggest doing so. Once the sealer dries it's pretty hard to remove. Here's my process...

1. Brush on the sealer in the space for one square. I start with the the boarder first. I complete the whole outside boarder, then work my way starting at the top from left to right downward. Kind of like reading a book.

 2. Lay the piece of fabric on the sealer. Press down with your fingers to make sure the fabric is smooth. Brush on more sealer if you need to around the edges.
3. Brush sealer on top of the smoothed fabric. You don't want to have gobs of sealer on top but you don't want it to be dry either. Just enough to cover the fabric, should be slightly sheer not solid white from the sealer.

Then repeat steps alternating the fabric patterns until one side of the suitcase is completed. I usually let it dry overnight and then do the other side. It gets really messy trying to work on the other side while the one side is wet. It doesn't look that great when it's wet, But when it dries it will look really nice.

I created one for each of my children this past week. I am going to put all their baby mementos I saved for them in it. You can also use them to store crafts or art supplies. I made one and put a baby shower gift inside.
The uses are really limitless!
Happy Creating!


Friday, April 24, 2015

Free Vintage Ephemera Printables or Clip Art


Vintage Ephemera

I was sorting/cleaning before I had my big surgery and realized I am a collector. Collector of almost anything old. I get it from my Dad, he was a collector too. He would open his drawer of old collected treasures and one by one we would examine each item..he would tell me how he acquired the old thing and usually there was a story or two. Now, I have my own drawer of treasures and over the years my collection has grown. I usually have two categories...Ephemera paper (flat) and Ephemera Misc (bulky stuff). When I am out and about at garage sales, thrift stores or antique shops I always keep my eyes open. You just never know what you might find. I also look on eBay. Sometimes you can find paper ephemera or junk drawer lots for cheap. It takes patience with eBay, but the payoff can be worth it. I took some of my paper treasures and scanned them so I could keep using them in my mixed media and scrapbooking projects. You'll find the links below..I hope you like them as much as I do! 

enjoy,
melissa


Saturday, April 18, 2015

Circle Journal Pages and Name Tags

This was for my last swap on the 2Peas FB Group swap. I decided with all my surgeries I didn't want to have deadlines and projects still due while I was trying to heal. The Circle Journals theme was each persons state. Each participant made a page about their home state and city. I started off by making a collage in PicMonkey. I added text to title each space in the collage. One the back side I listed my favorites as corresponds to the collage. I used My Minds Eye Cut and Paste paper and stickers. Silhouette US outline and Nebraska cutout. Also some washi tape and stamped black dots.


Saturday, February 28, 2015

Altered Block Graphic 45 Topography


I love Graphic 45 and when I needed to make an altered block for a swap I couldn't wait to use topography! I also picked up some little glass bottles, a big brass key, crocheted flower and a drawer pull. The first thing I did was glue the paper on each side and inked the whole block. Then I made the pin cushion out of a vintage silver jello mold. I stared that out by cutting a small circle of lace fabric and sewed the edges together making a opened ended ball shape. On the open end I pushed the stuffing through and pulled the thread tight. It reminded me of a hot air balloon shape. I hot glued the ball to the bottom of the jello mold. It turned out perfect for the top of the block. I think my partner liked it..I sure had fun making it!

Sunday, February 1, 2015

Organized Scrap Room


I think back to how many places I've had a "scrap room" in my house and laugh. What was I thinking? My bedroom, an entry hall (we never used), half of the kids play room, dining room and...finally...a room all it's own..I took over the kids toy room! It's a perfect space, just off 
the living room. Our house is really old, so it has many rooms. I came to realize if 
I wanted to get serious about creating I needed a place where I could...
                                                       1. See my creative supplies. 
                                                       2. Have a big work surface
                                                       3. Have good lighting
                                                       4. Not be closed off from the rest of the house/family
In all the other places I never utilized any of my supplies. My stuff just sat in bins and drawers. My new place works because I never feel like I am closed off to what the rest of the family is doing. That sounds weird but it really works for me. I converted our old entertainment unit into a craft supply cabinet. I also re-purposed a dresser and made my own Silhouette table from a metal file holder cart. I LOVE my area because everything has a place. I have labels on everything. When you don't know what you have, I think it's harder to create. I can't wait for the kids to outgrow their toys then I can take over the 4 seasons closet next to my creative space! I used to be a crop scrapper. I only really scrapbooked when I went away to crops and my stuff would be packed away until the next one.
I organize my embelishments by color in zippered "worm bags". They more sturdy than a plastic sand which bag and come in various sizes. They are perfect for compact storage! 
I have one bag for every color. There are basically three categories..metal,
ribbon and other (paper & flowers). 
I organize my paper also by color unless I have embellishments that go 
with the paper. Then I use a plastic folder from Crop Hopper. I find that when everything is organized I create better because I know what I have and where it is. I don't waste time looking..
Here's hoping you can get organized and start creating! :) 

Sunday, November 16, 2014

Christmas Tag

I LOVE thinking of ways to make my own embellishments using my stash. For this Christmas tag I made the embellishment using metal stamps and a bottle cap. First I ran the bottle cap through my cuttle bug to flatten it out. Then I stamped the word "Jolly" using a brick, hammer and the metal stamps. 

  I think using the brick makes it easier to stamp a clear image. After I stamped the letter I took white craft paint and dabbed it over the letters. I used a paper towel to wipe the excess paint off. Lastly I put a Tim Holtz star below the words, punched a hole in the top and tied it with bakers twine. I got the Santa image from the Silhouette store, the tickets were from my stash and I punched out the white boarder. I used Tim Holtz mini attacher to staple the ribbon on the top and lastly I inked the edges of the tag. I love how it turned out, and it's my favorite vintage style ta boot!


Happy Creating,
Melissa 

Saturday, October 18, 2014

Previvor, BRCA and Breast Cancer

It's been a crazy few months. In Jan my sister was diagnosed  with breast cancer. She got tested for the BRCA gene mutation, and it turned out to be positive. I got tested and I am positive also. We inherited it from my Dad. This means that we have a link in the tumor suppressing BRCA gene that is broken or mutated. According to BeBrightPink.org my risk of breast cancer is as high as 87% and ovarian cancer 54%. My genetic counselor said I am a "previvor", a survivor of a predisposition for a disease such as cancer. I found a couple FB groups that have been so informative and helpful. There are so many women going through the same thing I am. After meeting with oncologist breast  surgeons, plastic surgeon and oncologist gyn, and much research.. I made the decision to have a hysterectomy and preventative bilateral mastectomy (PBM).  I want the best odds of not getting cancer. I had other problems  related to gyn, so I am relieved to have had a my hyst a few weeks ago. Menopause hasn't hit me yet, but I'm sure it's on it's way! I am going to have my PBM in Jan/Feb time frame. One gal said on the FB BRCA Sisterhood group..you wouldn't get on a plane that had a 54% or 87% chance of crashing would you?  or It's not elective when the alternative is cancer.  I am a part of a FB group The Documented Life and did this page in my journal back in Jan. This journey has really changed me..and how I see the color pink!