I love all things crafty! I’m an upcycler, mixed media lover, kit curator, glue gun user, antique treasurer, sticker hoarder, art appreciator and paper maniac. I love scrapbooking, junk journals, vintage ephemera, paper crafting and creating! This is a place for me to share all my crazy creative thoughts with you. I hope you can be creative right along with me! :D
Thursday, November 28, 2013
Thankfulness Scrapbook Journal Completed!
I made some changes to my original "28 Days of Thankfulness" book. I was at Archivers and got a Heidi Swapp album for only $13. It was just the book and pages, but I thought that was pretty cheap. I even used my coupon so it was cheaper :) I decided to go with a 3 ring binder so I could put more pages in and I also like the sturdiness of a 3 ring. I took the pages out of the original book and viola here is what I came up with. I have to say it was much harder to keep it up than I thought it would be. I started out really good, but then slacked off and ended up finishing it this week. It was really fun do to though..it made me really think about what I appreciated in my life and just how darn lucky I am! Now to start on my Christmas projects tomorrow! I have a December journal/scrapbook to make. Although this one will more than likely be a weekly thing..not quite a daily thing.
Happy Creating,
:) Melissa
Sunday, November 10, 2013
Christmas Tags
I went to my monthly crop yesterday and had a great time as usual! I planned to work on swap tags , swap PL cards and my Thanksgiving thankfulness scrapbook. But I only got as far as the swap tags :) I signed up for a vintage group and sliver group. Somehow it's a bit more fun for me to make something for someone else in a swap! I bought some snowflakes a few weeks ago at Michaels on clearance..so I planned to use them when I signed up for the silver group! I started out by cutting silver corrugated paper into my tag shape, then adhered it to white cardstock (so the back would be blank white cardstock). I stacked the snowflakes on top of each other and spaced them by using a pop dot. I cut one blue snowflake out on my silhouette and glued that one on top of the stack, followed by a gem on top. I then printed out "merry & bright" on the same blue paper as the top snowflake. For the vintage tag I used Heidi Swaps Christmas paper stack from Michaels. I started out with numbered pattern background, and added a snowflake/flower shape patterned background paper strip and to the bottom of the tag. I then glued ric rac to the top and bottom of the snowflake/flower patterned paper strip. It reminded me of a Christmas or winter sweater! I used plaid pattern paper for a large circle, then I scalloped punched the "25" and glued that on top of the plaid pattern circle. I then cut two strips od music paper and stamped Dec 25 on one and glued them underneath the scalloped 25. I really like how they both came out! I may make a few more to keep for myself. I promise to post next on my Thankfulness scrapbook! Happy Scrappin,
melissa
Sunday, October 27, 2013
Daily December
I'm so jazzed right now...I just completed my second swap project on 2 Peas in a Bucket chat forum. I'm totally addicted to swaps now! I made a Daily December page front and back. My friend Wendy gave me the idea for the free standing envelope. She was working on her December daily book at the last crop I went to. She had some really awesome pages, and a big free standing pocket. It was as big as her pages, and really cute! I had some velum so I made the envelopes out of that. I just hope everyone likes them! I went to Michaels last Friday and couldn't believe they did not have any Christmas..I couldn't believe it!! I am actually AHEAD of myself and the season--it's unbelievable and feels GREAT!). So I ended up getting red glitter paper, green lined paper and white cardstock.
I didn't have time to go to Hobby Lobby or Achievers before my crop so I thought I would make that stuff work. I used the red glitter paper to make the rosettes, the green lined paper to make a pocket and the white cardstock to print out the 25s for the rosettes. I used sheet music boarder punched to go on the pocket. The sheets of paper in the pocket are lined note book paper, sheet music and black cardstock. I typed out "Makin my list and checking it twice.." on the lined paper and stamped Dec 25 2013 on the sheet music. On the second page I started out with green ledger paper I had and a red snow flake boarder at the bottom. I cut little strips of dictionary paper, washi tape and the green lined paper (that's on the other side) to go with a red button in the left corner. For the velum envelope I folded a 8 1/2 x 11 piece in half and sewed the top flap on, then sewed around the edges. Turns out velum is not fond of the sewing machine. On the envelope I put a library card pocket with 3 coordinating cards. I also cut little strips of the same paper and washi tape to put under the Merry Christmas Santa circle. To finish it all up I inked the sides. I can't wait to see what I get in return! I just need to make myself 11 more pages. I want to record something everyday..ambitious I know..but my 28 days of thankfulness will get me going..happy scrappin!
Saturday, October 26, 2013
28 Days of Thankfulness Scrapbook Journal
I saw a post last week on Two Peas in a Bucket forum asking if anyone was going to be doing a Thankfulness journal/scrapbook. Hmmmm...what exactly? So after reading what others had posted on the thread and looking at a few blogs, I thought what a great idea! Start on the 1st of November and then each day leading up to Thanksgiving, journal/scrapbook something you are thankful for. Then I thought why not make a kit and have a class at the OLL Craft Club that I go too? It was such a fun class! I even made kits..I kept it simple so that each day pictures and more embellishments could be added. To create the book I started in Microsoft Power Point. I like Power Point because you can arrange blocks of text and pictures anywhere on the page. I created 14 slides with "I am thankful for.." twice on each slide. After I printed them on 81/2 x 11 white cardstock, I simply cut them in half. I adhered 14 pages together to make 7 stronger pages that were two sided. I used a (waiting-to-be-recycled) cereal box sandwiched between white cardstock for the covers. After misting, inking and embellishing the book I used a bind-it-all for the class books (I used twine to tie the pages together on mine). I'm looking forward to Nov 1st! Here's my template as a PDF...happy creating!
28 Days of Thankfulness Template
Saturday, October 12, 2013
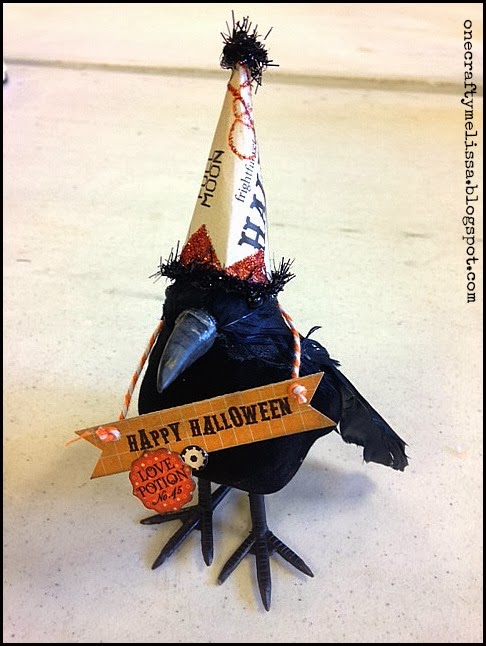
Halloween Crow
I was at the Dollar store recently and saw a big box of black crows. They were begging to be bought and decorated! I saw some at Walmart a few days later for a little more $$. I'm always so happy to find good deals at the Dollar store! First I measured out the little party hat and glued it together. The orange glitter boarder came on the 12x12 paper I cut the hat out from. I glued black Tim Holtz garland around the bottom, curled up a little of the garland to make a pom-pom for the top. I then printed out "Happy Halloween" on some orange paper and threaded orange and white twine around the crows neck. the "potion 45" is from the Streampunk Graphic 45 line. The party hat template is below..you can really print it out to make any size party hat. I'm more of a simple kind of gal, but I have seen the rows decorated with rosette collars, and super cute bases. Halloween is such a fun time for crafts and decorating!
Sunday, September 29, 2013
Halloween House Made out of Playing Cards
I got several decks of playing cards at a thrift store recently and wondered what I could make with them besides a banner. I saw some little houses made out of book paper for Christmas and that gave me the idea for houses. I made this one a little busy, but I would like to make a few more to put on my mantle that aren't decorated on every side. I thought black was appropriate for Halloween and red for Christmas. First I decorated the front of each card. I used Graphic 45 Steampunk Halloween line. I then took some scrap paper and cut it into 2 inch pieces. I scored the middle of each and then adhered it to two cards until I had the house frame. I took one card and scored it in the middle for the roof. I took black paper and cut out a triangle to fill in the roof. I used Tim Holtz black garland to line the roof. You could also layer scalloped boarders on the roof. I did a window with a flower box and door to make it a little more like a house. I will definitely be making some more for Halloween and Christmas!

Monday, September 23, 2013
Paper Grocery Sacks made into Gift Bags
I met my Aunt and Sister at Scrapfest in the Mall of America this past weekend (had SO much fun). I had some goodies for them and I decided to put them in paper grocery sacks. I was thinking of ways to decorate the bags and came up these. First I used brown mist and plastic stencils to make a design on the front of each bag. Then I sewed some lace around the top. The thicker one first and then the smaller one second. I also sewed (cotton Ribbon) handles at the same time as the lace. I used hearts cut out of book paper, a flower made out of vintage clothes pattern paper and buttons. My Sister and Aunt really liked them.
Subscribe to:
Posts (Atom)