I love all things crafty! I’m an upcycler, mixed media lover, kit curator, glue gun user, antique treasurer, sticker hoarder, art appreciator and paper maniac. I love scrapbooking, junk journals, vintage ephemera, paper crafting and creating! This is a place for me to share all my crazy creative thoughts with you. I hope you can be creative right along with me! :D
Saturday, October 26, 2013
28 Days of Thankfulness Scrapbook Journal
I saw a post last week on Two Peas in a Bucket forum asking if anyone was going to be doing a Thankfulness journal/scrapbook. Hmmmm...what exactly? So after reading what others had posted on the thread and looking at a few blogs, I thought what a great idea! Start on the 1st of November and then each day leading up to Thanksgiving, journal/scrapbook something you are thankful for. Then I thought why not make a kit and have a class at the OLL Craft Club that I go too? It was such a fun class! I even made kits..I kept it simple so that each day pictures and more embellishments could be added. To create the book I started in Microsoft Power Point. I like Power Point because you can arrange blocks of text and pictures anywhere on the page. I created 14 slides with "I am thankful for.." twice on each slide. After I printed them on 81/2 x 11 white cardstock, I simply cut them in half. I adhered 14 pages together to make 7 stronger pages that were two sided. I used a (waiting-to-be-recycled) cereal box sandwiched between white cardstock for the covers. After misting, inking and embellishing the book I used a bind-it-all for the class books (I used twine to tie the pages together on mine). I'm looking forward to Nov 1st! Here's my template as a PDF...happy creating!
28 Days of Thankfulness Template
Saturday, October 12, 2013
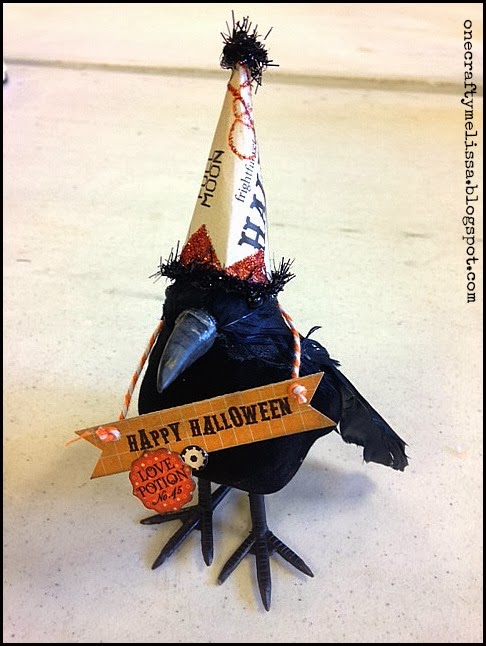
Halloween Crow
I was at the Dollar store recently and saw a big box of black crows. They were begging to be bought and decorated! I saw some at Walmart a few days later for a little more $$. I'm always so happy to find good deals at the Dollar store! First I measured out the little party hat and glued it together. The orange glitter boarder came on the 12x12 paper I cut the hat out from. I glued black Tim Holtz garland around the bottom, curled up a little of the garland to make a pom-pom for the top. I then printed out "Happy Halloween" on some orange paper and threaded orange and white twine around the crows neck. the "potion 45" is from the Streampunk Graphic 45 line. The party hat template is below..you can really print it out to make any size party hat. I'm more of a simple kind of gal, but I have seen the rows decorated with rosette collars, and super cute bases. Halloween is such a fun time for crafts and decorating!
Sunday, September 29, 2013
Halloween House Made out of Playing Cards
I got several decks of playing cards at a thrift store recently and wondered what I could make with them besides a banner. I saw some little houses made out of book paper for Christmas and that gave me the idea for houses. I made this one a little busy, but I would like to make a few more to put on my mantle that aren't decorated on every side. I thought black was appropriate for Halloween and red for Christmas. First I decorated the front of each card. I used Graphic 45 Steampunk Halloween line. I then took some scrap paper and cut it into 2 inch pieces. I scored the middle of each and then adhered it to two cards until I had the house frame. I took one card and scored it in the middle for the roof. I took black paper and cut out a triangle to fill in the roof. I used Tim Holtz black garland to line the roof. You could also layer scalloped boarders on the roof. I did a window with a flower box and door to make it a little more like a house. I will definitely be making some more for Halloween and Christmas!

Monday, September 23, 2013
Paper Grocery Sacks made into Gift Bags
I met my Aunt and Sister at Scrapfest in the Mall of America this past weekend (had SO much fun). I had some goodies for them and I decided to put them in paper grocery sacks. I was thinking of ways to decorate the bags and came up these. First I used brown mist and plastic stencils to make a design on the front of each bag. Then I sewed some lace around the top. The thicker one first and then the smaller one second. I also sewed (cotton Ribbon) handles at the same time as the lace. I used hearts cut out of book paper, a flower made out of vintage clothes pattern paper and buttons. My Sister and Aunt really liked them.
Saturday, September 14, 2013
Food Coloring Kids Fun
My boys are pretty energetic, so trying to find something to hold their attention is tough. I filled clear cups with primary colored water. Then I gave the boys little cups, and some other stuff leftover from a science kit . They had a ball mixing and pouring. The fun lasted for at least an hour..to my amazement! Sunday, September 8, 2013
Back in the Game with Chirstmas Tags
Wow, nay I say it's been a QUICK three months since I last posted. I didn't create much this summer. We started out just busy with outdoor stuff and little fun trips here and there. Then I had surgery in the beginning of Aug and here we are in Sep! I'm quite busy at work and will be right up until I leave for Scrapfest at the Mall of America in two weeks. I'm SO EXCITED to see my Sister and Aunt! It's going to be a fun (and too fast) weekend. I joined 2Peas in a Bucket website and will be participating in my first "swap". I joined a Christmas tag swap. I signed up for one Vintage group. I stared out with some vintage post cards I got off of eBay. Really cool, as some have writing on them and are from 1914. I then did a blanket stitch to make a boarder. My first attempt..not too bad I hope! I sewed some buttons, then glued some mini vintage plastic holly and then tied a piece of twine on top. I sprayed some sheet music with peal mist and cut out to match the vintage post card tag. Then I found a cute vintage looking gingerbread man and glued the image to red card stock. I wanted the little guy to be a bit thicker than just plain card stock. After I fussy cut him out, I colored him a little bit more with my Stampin Up Markers. Then tied it all together with some vintage off white lace and ric-rac.The picture is of the front and then the back. I'm pretty happy with how they came out. I just hope the other swappers are happy too!
Thursday, June 27, 2013
Creating a Wall Photo Gallery
It all started when I picked up a super cool vintage jump rope (complete with wooden handles and the cardboard packaging!) at my fav thrift store. I really wanted to figure out a way to display it. A wall in my boy's "playroom" was begging for something other than the tan paint I had painted it a while back. My style is vintage, homey and sort of country...so of course I couldn't find the right pictures to hang on the wall. So, I decided to create my own using some frames I had bought a long time ago at Walmart...I added October Afternoon paper, a vintage children's record, flash cards and some other little bits and pieces. I also hung one Crayola crayon box and a chalk box. I used 3M Velcro strips to hang everything so I could remove the sticky stuff later. The hardest part was trying to take pictures of my finished project...glass frames are a bit tricky!
Subscribe to:
Posts (Atom)